Keep your vacuum or steam cleaner running like new

August 8, 2012

Did you know that you can find repair parts for almost any vacuum cleaner or steam cleaner?  A quick online search will point you in the right direction.  We’ve had our steam cleaner for over ten years now and it’s still running strong.  It’s needed a new hose as the original one developed a split where it enters the main chassis.  But, the hose cost about $30, shipped, while a new steam cleaner would have been about 10 times as much.

To keep the suction strong on your vacuums and steam cleaners, remember to take them apart and clean them at least once a year.  To keep your steam cleaner from smelling like a dumpster, after you dump out the dirty wash water, use the hose and vacuum some water out of your sink to rinse out the internals.  Fine dirt also accumulates around the diverter–the thing that switches suction from the body of the steam cleaner to the hose–and should be cleaned out.  

Vacuum cleaners develop clogs at points where their hoses narrow or change direction rapidly.  Check these points and the beater for build-up that can make your vacuum lose suction.  Bag-less vacuums need more maintenance than vacuums that use bags as they depend upon a series of filters to keep what you vacuum out of the air you breath.  Those filters fill up quickly and reduce your vacuums power.  Bagged vacuums at first glance seem like they are more work but they are simpler to operate over the long run and cheaper to own–those filters are expensive and should be changed a few times a year.

A little TLC and preventive maintenance will keep your vacuum or steam cleaner running like new and save you money in the long run.

Installing a Honeywell HE-360, Part II

November 9, 2011

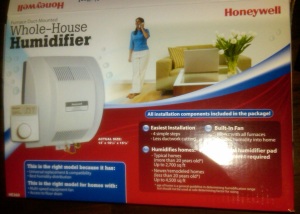
Honeywell box When I picked up the humidifier from Home Depot, I went through the box to make sure I had everything I needed for my install.

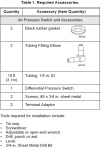
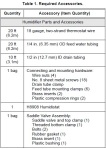
Surprisingly, everything that I would need to install the unit was included. Inside the box are: the humidifier unit, a saddle piercing valve, a humidistat, a pressure switch, three sizes of tubing, various screws and fasteners and instructions.Included parts More included partsThe pressure switch is a new addition in lieu of the sail switch. I’m not sure when they switched out the sail switch but I wasn’t looking forward to installing it.But, the default installation assumes that you have a floor drain available to route the humidifier’s waste water into. We don’t have a floor drain so I planned to stub into the condensate line from our heat pump air handler and dehumidifier.

Installing a Honeywell HE-360 Humidifier, Part I

November 6, 2011

This summer, I installed new hardwood floors in the main living area of our home.  Hardwood floors are awesome — much easier to care for than carpet and great if you have kids and/or pets.  But, hardwood floors need your home to maintain a reasonably consistent moisture level for them to be happiest.  I don’t let the moisture level above 55% in the summer time or below 45% in the winter time.

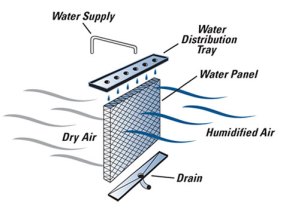
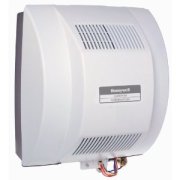
If you’re using console humidifiers in your home, they can become a maintenance nightmare after a while.  Last winter, our toddler had a great time playing with our humidifiers and the routine cleaning of the wicks and refilling of reservoirs quickly becomes tiring.  So, I decided that this heating season I would install a whole-house humidifier.  Power flow-through humidifier

Researching the different types of humidifier options, I quickly became overwhelmed.  I like to be certain that I’m making the best choice when making a purchase and with many positive and negative reviews of the humidification options, it didn’t seem like there was any “right” answer for us.

In the end, my potential choices came down to a humidifier from Desert Spring, Best Air Pro or Honeywell.  The Desert Spring units had too many complaints for my comfort level.  The Best Air Pro has a limited distribution network and I wanted to purchase my unit in person.  So, I settled on the Honeywell HE-360.  Over the years there have been numerous revisions the the HE-360.  Different reviews may refer to various revisions but you can’t be sure which one because the model number has never changed or iterated.

The HE-360 is available in two flavors: with or without the installation kit.  Unless you read the fine print, you’re left wondering why the HE-360 might be $189 from one retailer or $230 from another.  The $230 package includes the installation kit.  Of course, when you look on Amazon.com, Lowes.com or HomeDepot.com the model numbers don’t change, just the price.  The pricing and labeling on the HE-360 is almost as confusing as the instruction manual.

Honeywell HE360 Pricing on the HE-360 seems relatively fixed.  There’s not a difference between the price at Amazon.com or Home Depot — as long as you compare apples to apples.  I picked up my unit from Home Depot yesterday morning–it was the only one they had in stock.  They had a few of the Honeywell bypass-type humidifiers but I was after the HE-360.  Luckily, it was perched three shelves up, almost out of sight.

My next installment will cover unboxing and walking through the parts and preparation for installation.  The third installment will cover installation and final thoughts.  I’ll have part II up on Wednesday and part III up by Friday.  As a teaser though, the humidity in our 1300sf townhouse has gone from 30% to 45% in the past 24 hours.  I’m pleased with my purchase.

Sewing Machine Manuals

October 31, 2009

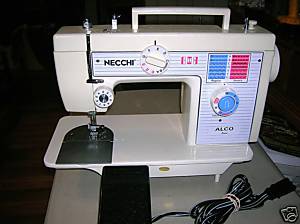
My wife and I have been wanting to get a sewing machine for a few years.  There are several projects that we’d each like to do and our girls want to make some clothing items.  Last week after doing some research and watching auctions, I picked up a Necchi 524-FB on eBay.  Necchi 524 FBNo matter what brand sewing machine you own (Bernina, Singer, Simplicity, Kenmore, Elna, Riccar, Necchi, Pfaff, Viking, White, etc) having a copy of the owners manual is important.  If you’re DIY’er or someone that performs their own maintenance having a copy of the service manual is even better.  (I’m still looking for a copy of a Necchi 524FB service manual) Sewing machines can last for decades or longer but they do require occasional care and maintenance.

I looked around online and decided to purchase a manual from an online shop called Sewing Center US.  Their manuals are PDF scans of the actual manuals.  Some places sell photocopied or bound fascimiles but I just wanted a PDF.  Dozens of places sell manuals like these; I just happened to choose Sewing Center.  Well, after I’d paid for my manual I tried to download it using the link they emailed me.  What I received from my download was a cartoon image of a manual.  show_image_in_imgtag.php

Well, I tried the download a few more times to make sure I hadn’t done something wrong and then emailed customer support.  Through the course of the afternoon I emailed them probably three times.  The next morning I received an email from the operator of the site.  In it, he sent me a direct download link for a Necchi 524 Lycia — not my machine.  I have a Necchi 524-FB.  So, I emailed him to let him know I had the wrong link and could he please send me the correct link.  For one day I waited.  No response.  Nothing.  I sent another email the next day.  Not rude emails just reminders incase he was busy or forgetful.

It’s been a week now, I’ve still heard nothing and I’m out $10.  $10 isn’t a lot for a manual but it’s a lot to pay for the wrong PDF and deplorable customer service.  I’m probably going to pay for another manual from a different site.  I just wanted to warn you in case you thought about purchasing a manual from Sewing Center US.

Does anyone need a manual for a 524 Lycia?

==================

Update: 11/1/2009

I purchased a manual from SewingMachineManual.net and had it downloaded within 30 minutes.  It cost me ten dollars.

Drinkwell Pet Fountains

September 9, 2009

We’ve had our Drinkwell Original fountain for about three years now.  Our cats love it so much that it’s the only thing they will drink out of.  Last month we went on a weekend trip and forgot to top off the fountain before we left.  When we got home the fountain was dry and the pump motor had seized.  Parts can be hard to find for these fountains and they can be expensive.  So, I did some research.  The pump motors for the Original will be made by either Askoll or Resun.  Our motor happened to be made by Resun.  You can purchase the motor, o-ring and impeller from VetVentures.com for $18.50 + shipping.  That was more than I wanted to pay so I did some more searching.

Resun makes a lot of pumps.  They also make aquarium filters.  Their filter model HF-2001 uses the same motor as the pet fountain.  But, it’s almost impossible to find parts for the Resun filters and you can’t buy the motor by itself.  If you can find one of the Resun filters for a good price, you can pull out the motor and put it in your fountain.  I couldn’t find a good price on the Resun HF-2001 so I did yet more research.

Hagen makes a line of aquarium filters that look almost identical to the Resun HF-2001 filters.  These filters go by different names with AquaClear 20 Power Filter being the most common.  Hagen has different product lines including Fluval.  But, for our needs, the important thing is that there are many Hagen products that use the same motor that will fit our pet fountain — the Hagen a-16000.  If you can find a good deal on this motor or one of the filters that use this motor you’ve got yourself a good deal.  I picked up an AquaClear 20 Power Filter on eBay for $10, shipped. 

Vet Ventures has more information on the various fountain models.  They also sell all of the replacement parts you may need for your fountains.

If you’re looking for more information on the Hagen filters, Hagen’s website has a wealth of information on their Hagen, AquaClear and Fluval products including general info, parts diagrams, operating manuals etc.

Make your water heater last forever (almost)

August 17, 2009

Water heaters are one of those appliances that have a predetermined lifespan — or so we’ve always been told.  Actually, water heaters have rust-preventing consumables that, when expended, will allow your water heater to begin rusting.

inside an electric water heater

inside an electric water heater

Since we purchased our home six years ago, we’ve been told by every HVAC technician entering our home that our water heater needs to be replaced.  *note* The HVAC technicians are there doing preventive checkups on our heat pump and air handler.   First, some history.  Our townhome was built in 1988  so our water heater is 21 years old.  Most water heaters are rated to last 6, 9 or 12 years.  So how did our last so long?  There are two major factors that affect how long your water heater lasts.  “How much water it heats” and “how hard your water is.”  If your water has a high mineral content or you soften your water with some sort of chemical treatment you need to perform preventive maintenance on your water heater more often.  If you have a full household and you go through a lot of hot water, your water heater is working harder and needs to be looked at more often.

anode life cycle

anode life cycle

If a water heater works fine for so long, what makes it eventually start rusting?  Inside every water heater are metallic rods called anodes.  The anodes (made of magnesium, aluminum or some combination thereof) oxidize and break down so the steel in your water heater doesn’t.  Usually a 6-year water heater has a small anode while 9 and 12 year water heaters have one larger or sometimes two anodes.  The key to making your water heater last is making sure your water heater anode is still able to function.  You’ll have do a little work and inspect your anode but this is the only way to know for sure how well your water heater is being protected.

This summer I inspected our water heater for the first time — ever.  Being a naive home-owner, I didn’t know they needed to be inspected.  One morning our hot water wasn’t so I bought a book and educated myself.  When I pulled our anode out it was just a rusty wire about twelve inches long.  That’s not a good sign.  A new anode is about 40″ long and 3/4″ – 1″ in diameter.  Our anode obviously hadn’t been working for a while.  To investigate things further, I drained our water heater, pulled out both elements and looked inside with a flashlight.  What I found was even more discouraging.  Inside of every anode is a steel wire that ties everything together.  Our steel wire had rusted and broken off.  The part that broke off contacted the lower heating element and burned it out.  Hence, the dead water heater.  Talking to our neighbor I discovered that he’d recently replaced his water heater because it was twenty years old — just like ours.  There was nothing wrong with his water heater so he offered it to us.  I gladly accepted his offer and brought the water heater home to check it out.

The anode in his water heater was a little better that ours.  The internal wire was full length and there were a few chunks of anode doing their job.  The inside of the tank looked clean and the mounting points for the heating elements were in good condition.  The mounting points on our water heater had begun to rust and the inside of the tank didn’t look good.  Encouraged by what I saw, I bought new heating elements. The anode I had to order on-line from WaterHeaterRescue.com.  The heating elements I picked up from Lowes.  When you are shopping for heating elements there are cheap elements and there are good elements.

I bought a cheap upper element and a good lower element because the lower element does the most work. In retrospect I probably should have purchased a good upper element as well but I’m not losing any sleep at night over it.

Before I put everything back together I flushed out the water heater tank.  As the anode does it’s job and breaks down, small pieces fall to the bottom of the tank.  Also, minerals in the water precipitate out by the extreme heat of the heating elements.  This precipitates build up in the bottom of the tank, making it less efficient and potentially damaging the bottom element if they build up enough.

what builds up in the tank

what builds up in the tank

Flushing the tank took about ten minutes but I had the tank on our back porch while I inspected it. I was able to slosh water inside, drain it and repeat.  Flushing the tank while it’s hooked up could take anywhere from a half hour to an hour. I was amazed how much sediment came out of the drain.  I’ll be flushing the tank once a year now.  I let the tank sit out in the sun for about an hour to dry. I also put EvapoRust on the heating element fittings and anywhere else that I saw signs of rust. EvapoRust is non-toxic and I flushed the tank thoroughly once it was connected to our hot and cold lines. After I had all of my parts gathered and my tools assembled, it took me about two hours to reinstall our “new” water heater.  I’m slow at wiring and sweating copper so you might be faster.

My neighbor bought a new water heater and now had peace of mind that his water heater would last at least twelve years.  Our donor water heater was now refurbished and I was confident that it would last at least twelve more years.  I plan to check our anode at the three-year and six-year mark, just to see how it’s doing.  Total cost for our “new” water heater?  $40 for the anode, $10 for the upper anode and $20 for the lower anode.  I could have reused the old anodes but I like the extra insurance of new ones.  My neighbor’s water heater cost him about $350.  His is a little more efficient than mine but I’ll take care of that with a blanket of insulation around our tank.

When thinking about conservation, fixing something that is old is almost always a smaller impact to the environment then buying something new.  Keeping my water heater out of a landfill made my choice to repair our water heater rather than purchasing a new one even easier.  The energy saved by purchasing a new, more efficient water heater would take centuries of use to recoup the energy it took to produce that new water heater.
An update and coming changes

August 13, 2009

I’m still playing around with the formatting and layout for this blog but I have a ton of posts in the pipeline so please stay tuned for forthcoming posts.

What it’s all about

August 11, 2009

If you’re thinking about repairing something or wondering how something works, I’m here to give you some encouragement and possibly some advice.  With so much information available to us on the internet or in printed material, it’s amazing that we’re throwing away more “stuff” than ever before.  “Everything is disposable” is a concept that’s been taught to us from an early age.  Something is always coming out that’s better than what we have now or it’s easier to buy “a new one” than to fix what we’ve got — or so it would seem.  Luckily for me, I was raised by a grandfather that tried to fix things before he bought a replacement.  Sometimes the fixes worked and sometimes they didn’t but it was important for him to try.

The truth is, with a little research and ingenuity we can usually fix whatever is broken.  Fixing something is almost always cheaper than buying something new to replace it.  And, for me, fixing is fun.  It can get distracting so my wife has to reign me in every now and then.

So, if you have something that needs to be fixed or you’re just curious I’ll walk you through repair projects that I’ve done.  I’ll also show you where to find the parts you may need, the repair manuals to guide you and share with you which tools I think are appropriate for the job.  If you like the projects, let me know.  If there is a project I haven’t covered or you have a question let me know and I’ll try to find answers for you.

Until next time, stay curious!